Body Patch Panels 101: The Basic Method in 5 Easy Steps
If your classic car or truck has rust, don’t worry, you’re not alone. Body patch panels offer a great alternative to replacing the entire body part after rust has invaded a portion of the panel. There are many formed patch panels, specific to your vehicle and body area, found in our catalog that take the “risky” part of patch panels out of the equation entirely -- alternatively, we will also cover how to use sheet metal to repair smaller, flatter areas in this article as well.
Difficulty Level: Moderate - Basic Welding & Hand Tool Skill is Required
What You’ll Need:
- Marker
- Cardboard
- Angle Grinder
- Acetone, Possible Media Blaster
- Welder
- Bondo
Here’s the Problem with Bondo
Bondo putty is probably one of the most common ways people “repair” damage on a car’s body -- while we actually use Bondo putty in the method below, it’s only used to smooth over a surface. You might be tempted to just grab a body putty kit from the local auto parts store, slather it on, and just call it a day, but we caution against the use of Bondo for major body work.

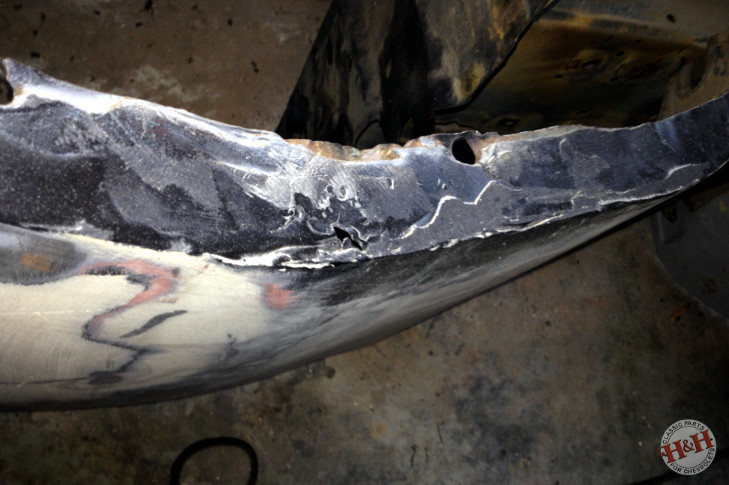
As you can see on this 1974 Camaro fender, Bondo can come off in chunks over time. This Bondo body work was done in a professional body shop and the owner noticed the putty pitting about 4 years later. He’s now in the process of getting it all off so he can weld in a patch panel instead.
Using Bondo putty to replace an entire rusted area or fill in a dent is very difficult to get “right”, it’s also a fairly short term solution. For those unfamiliar with this repair method, you place a piece of mesh over the damaged area, fill it in with a putty mixture, and smooth it to conform to the body lines of the car.
Even if you get it perfect the first time (many don’t and end up having to chisel off the dried chunks and start over), the area will eventually pit and crack over time. This method, even when perfected, is a bandaid and not a true restoration of damage. Patch panels offer a long term fix for metal damage.
Patch Panels Are Easier to Work with Than You’d Think
Body patch panels seem like a huge task, but you’d be shocked at how basic the process really is. The method we are about to outline is very simple, although some projects may become more involved -- this method is best for smaller areas on floor panels, quarter panels, and fenders.
Step 1: Mark the portion you are replacing with a marker before cutting. For pre-formed panels, lay the panel down over the area it is intended to replace, and draw the shape with the marker.
Create a template of the area using cardboard (skip this part if using area specific/formed panels). Cut the area using an angle grinder, air tools work the best for this portion of cutting.
Perhaps the most important factor leading to the success of this process is fitting the panel in as perfectly as possible. Be careful not to over cut the area you intend to replace, especially if you’re using pre-formed panels, and make sure your replacement piece is large enough if using sheet metal squares.
NOTE: Skip to step 3 if using pre-formed panels.
Step 2: When using sheet metal for straight and flat areas, find a similar gauge metal, trace the template, and cutout with metal sheers or angle grinder (electric or pneumatic is fine).
Hand shape the metal, if you can’t do this, buying the pre-formed panel is advised instead.
Step 3: Prep the metal (both the body panel and patch panel) thoroughly at this point. This may require a simple wipe down with acetone, but you may have to clean it extensively with a media blaster -- don’t skip this step, restoration is all about craftsmanship and quality work.
Step 4: Now is when you need to get your welder ready. Lay the metal in place and spot weld it into place.
When welding panels with a MIG welder, you’ll want to use a 75% argon/25% Co2 mixture.
Lay a long bead of weld instead of small dots because the metal is so thin. Make 1/4” weld spots and grind the welds down with an angle grinder.
Step 5: After grinding the spot welds down, cover the patch seams with a very thin layer of Bondo putty -- do not cake on the Bondo, it is only meant to smooth and fill the seam! Sand the area smooth by hand and the area is now ready for paint.
There are many other methods when it comes to patch panels, but this is the one we’ve found to be the easiest to follow and it works great if you take your time and concentrate on your cuts. It shouldn’t take more than a few hours to complete to process and get the car ready for paint. Once painted, there will be no signs of rust or damage ever existing on the area.